With the increased adoption of IaaS cloud services such as Amazon Web Services (AWS) and Microsoft Azure, there is also a greater need for security controls in the cloud. Firewall and IPS vendors such as Palo Alto, Checkpoint, Fortinet have made available virtual instances of their products ready to run in these cloud environments. These tools can provide great advantages on top of the existing security controls inherent in the cloud platform. For example, security groups in AWS control traffic flow to/from IP addresses and ports, but adding a Palo Alto or Checkpoint gateway can provide more inspection capabilities and filtering, especially on the application level. In addition to firewall capabilities, these products can provide extra features such as intrusion prevention, URL filtering, and other features that are lacking with the native security controls.
However, there is still lots of manual configuration expected from the Security or Network administrators, such as configuring interfaces or network settings, firewall and threat prevention rules, and so on. But in a cloud environment where speed and flexibility are its main assets, waiting for a security administrator to put in a rule for a newly created instance can seem to be a step back. The vendors above are definitely aware of this, and have introduced features such as Palo Alto’s capability of reading AWS attributes (for example tags or instance IDs) and then using them in dynamic rules that get updated as changes occur in the cloud environment. For example, you can create a group with the setting to include anything with a certain tag, and then use this group in a security rule to allow Web traffic to it. The gateway will then know to allow web traffic to any new or existing instance that has this tag. (A full list of monitored AWS attributes can be found here).
But there are still more features that you might want to configure automatically that are not included by the vendor. The vendors mentioned above all have API interfaces available, and so combining that with the tools from Microsoft or Amazon, we can easily write small pieces of code to automate lots of these tasks. To demonstrate this, I wrote a lambda function that monitors AWS instance starts and stops, as well as security group updates, and then pushes (and deletes) rules to a Palo Alto gateway based on these changes.
In this post, I will go over the different components of my code, its design, and then show it in action. Finally i will list a number of notes and considerations as well as a link to download the code.
Components
Palo Alto
Palo Alto instances can be accessed from the Amazon marketplace. Palo Alto provides excellent documentation on how to set up a gateway in the AWS, and I would recommend to start here for the initial configuration. Another useful case study provided by Palo Alto is on how to configure and use dynamic address groups in rules, where the groups are based on AWS attributes.
For this setup, I had a Palo Alto gateway configured as an Internet gateway in AWS, and so all internet traffic from my instances was passing through it. I also had an elastic IP assigned to its management port, and my lambda function used this IP address to configure the gateway. Using a public IP address to configure the gateway is not the best option, and I would recommend using a private IP instead (I address some of the limitations this might introduce in the notes section below).
AWS CloudTrail/S3
CloudTrail is a service from AWS to log and store the history of all API calls made in an AWS environment. CloudTrail saves all the logs to AWS S3 which is another AWS service that provides object storage. CloudTrail has to be enabled so that we can monitor when changes are made that are relevant to our code, and then act based on that information.
More details on CloudTrail and S3 can be found here and here.
AWS Lambda
Lambda is a service from AWS that lets you upload code, and AWS will run it for you based on triggers you set up (such as triggers from other AWS services or external triggers), all this without having to run a dedicated instance for your code. In our case, we will use CloudTrail (S3) as a trigger for our code, so that whenever a new change is made in the environment, the code can scan the changes and determines if a corresponding change is required in the Palo Alto gateway.
Details on AWS Lambda can be found here.
Code Features/Design
Adding rules
The lambda function will monitor the following two events for adding new rules:
Once any of these two events is detected, the function will extract the relevant information for rules required to the instances affected, and add the corresponding rules.
Rules added have the name corresponding to the type of event that triggered them. If the rule added is because of an instance started, then it’s named ‘instanceId-#’ where # is increased with every rule added, but if it is due to a change in a security group, then the naming is ‘groupid-#’. The naming convention is used by the code to track the rules it added.
Unnecessary rules
Since the Palo Alto gateway is running as an internet gateway, there are many scenarios that are not relevant, and the code will try to filter out these events so that we don’t make any unnecessary changes to the Palo Alto gateway. The following scenarios would not introduce changes to the Palo Alto gateway:
Instances that are started but that don’t use the Palo Alto as their internet gateway. For example, there can be multiple internet gateways configured and we're only concerns with instances that use the Palo Alto to reach the internet.
In instances with multiple interfaces, the code checks all the interfaces, and only includes those that use the Palo Alto instance as an internet gateway.
Security group rules that have a source from within the AWS VPC will be filtered out. The Palo Alto gateway in this instance is used as an internet gateway, and so traffic from within the VPC would not pass through it.
Security group rules that reference other security groups as a source will also not be included. These rules imply that the traffic would be local to the VPC and so would not pass the internet gateway.
Also before adding a rule, a test is made to make sure traffic is not already allowed, and only after making sure that traffic is denied, we will add a new rule.
Rule location
The code will also only add rules at the bottom, so that the security administrator can create rules at the top of the rule base that would override anything added dynamically. This can be used to control the rules automatically added. Furthermore, we specify in the code the bottom most rule that the new rules have to go above, and we can use this to control the location of the rules so that certain rules always remain at the bottom (For example, our clean up rule).
Cleaning up
When instances are stopped or rules in security groups are removed, we want any rules that we added to be removed. To avoid removing any permanent rules added by the security administrator, the code will only remove rules that it added previously to the rule base (This is can be controlled using the naming). The following events are monitored as triggers:
Imported Modules
I tried not to import any modules that don’t come with a default installation of Python except when needed. The only exceptions are:
Boto3
Boto3 is the AWS SDK for python. Using boto3 we can make API calls to AWS to get relevant information that will help us gather the necessary details to read events from AWS and build the rules and changes we want to push to Palo Alto. More details on boto3 at https://boto3.readthedocs.io/en/latest/.
Paloalto.py
These are functions that I wrote to interface with the Palo Alto gateway. The functions include adding/deleting rules or objects, searching rules and getting details, and saving changes.
To download the latest version of this code, refer to the github link. You can also refer to this blog post which goes over the details for writing it.
Netaddr
I used the IPAddress and IPNetwork functions from netaddr to allow quick checks on IP addresses (For example, if an IP address belongs to a certain subnet).
Event Handling Logic
The main function in the code is the lambda_handler, AWS passes to it the event that triggered it, which in this case would be adding a new entry to S3 (by CloudTrail):
The event passed by AWS contains the location of the S3 object that has the new cloudtrail entries. Our first step is to extract the name and location of this file.
Second we have to retrieve the file using the S3 methods from boto3, and then uncompress it using gzip.
The contents are then parsed as json to allow us to read and extract properties easily.
Finally we iterate through all the records in the logs provided searching for any of the following events:
Call event_StartInstances which returns the list of rules relevant to the Instance in the event. In this function, a list of instance Ids are extracted, and the following is performed for each instance.
First a list of relevant subnets is created. Relevant subnets are those that use the Palo Alto as their internet gateway.
Second, a list of all interfaces belonging to the instance is created along with the subnets each belongs to.
For each interface that belongs to a subnet in the relevant subnets, a list of security groups attached to it is compiled.
Finally, the rules of all security groups compiled are parsed through, and the relevant rules are added to a list to be sent back.
For each rule returned, first we have to convert the format to something that can be understood by Palo Alto. This means that we need to add zone definition, translate the destination port to a corresponding service and application, and specify the action for the rule. I used the aws_rules_to_pa function to convert the format, which in turn uses aws_to_pa_services to map port numbers to application and service combinations.
Once the format is changed, we can now test the existing rule base allows this traffic. If it is already allowed, then we move to the next rule in our list from the first Step, otherwise we add the rule on the Palo Alto gateway and move it to the proper location.
Finally, commit to save the changes on the Palo Alto.
Call event_StopInstances to get a list of Instance Ids from the log event.
For each instance id, call paloalto_rule_findbyname to get a list of all existing rules added by earlier by our code.
Remove each rule returned.
Commit to save changes
AuthorizeSecurityGroupIngress
Call event_AuthorizeSecurityGroupIngress to get a list of all rules to be added. (Similar function to event_StartInstances described above).
Convert each rule to Palo Alto format using aws_rules_to_pa.
Find if there are already existing rules that would allow the traffic for each rule, and discard any rule that has a match.
Add remaining rules and move them to the proper location.
Commit to save changes.
RevokeSecurityGroupIngress
Call event_RevokeSecurityGroupIngress to get a list of relevant security rules to be removed.
Find all rules added by our code for this security group (using the rule names)
Compare the matching rules on the Palo Alto with the list of relevant rules from Step 1.
Remove rules that match both lists.
Commit to save changes.
In action
Setup
To run the code as is, the following will be required:
Palo Alto instance configured with a publicly accessible IP address for management.
-
Handler should be set to lambda.lambda_handler.
No VPC set. (If you would like to set a VPC, refer to the Notes section below for more details).
IAM role (with policy attached) to allow the lambda function access to query your S3 and EC2 resources.
Timeout value of 25 seconds.
Trigger set to the S3 bucket containing the CloudTrail logs.
Runtime set to ‘Python 2.7’
Finally you will need to upload the code as a zip file to your lambda function. Before doing so, there are some hardcoded variables that need to be set first (All of which are at the top of the lambda_handler function in lambda.py):
pa_ip: IP address of your Palo Alto gateway.
-
pa_bottom_rule: Name of the rule which the lambda function would be adding on top of. This would usually be the clean up rule in your security policy.
pa_zone_untrust: Name of the outside zone configured on the Palo Alto gateway.
pa_zone_trust: Name of the inside zone configured on the Palo Alto gateway.
pa_sgp: name of security profile group in Palo Alto to be set on rules added.
igwId: Instance id of the Palo Alto gateway.
Runtime
In the following example, i had a simple setup of a 3 web server instances that use a Palo Alto instance as their internet gateway. I set the variables for my lambda function to point to my Palo Alto, provided the Access Key, etc.
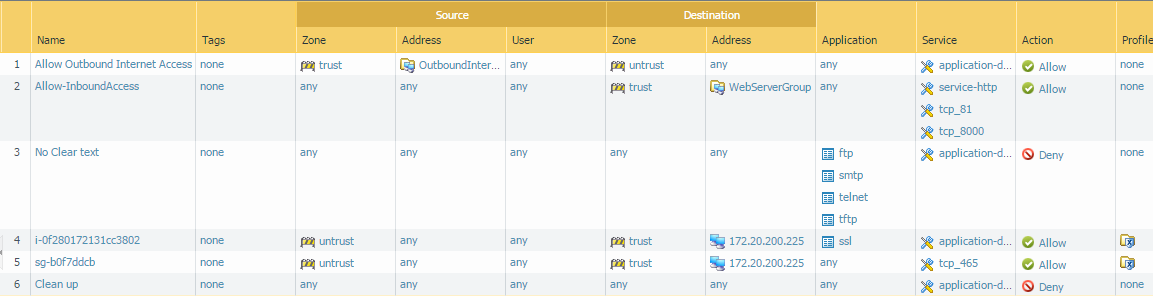
I had a basic security rule base configured with 4 rules initially:
Two rules for my web servers. One rule to allow access in (on tcp ports 80,81, and 8000), and one rule to allow access out from the web servers.
One rule to deny any clear text authentication protocols such as ftp, telnet, etc.
Finally a clean up rule so that all other dropped traffic is logged.
I set the ‘Clean up’ rule to be my bottom rule in the lambda function, so that all rules created would be added between rules 3 and 4.
Starting an Instance
I then started my 'web server 2' instance which had the IP address 172.20.200.225, and had the webserver_sg security group assigned, which allowed traffic from any internet source to destination ports 80 and 443:
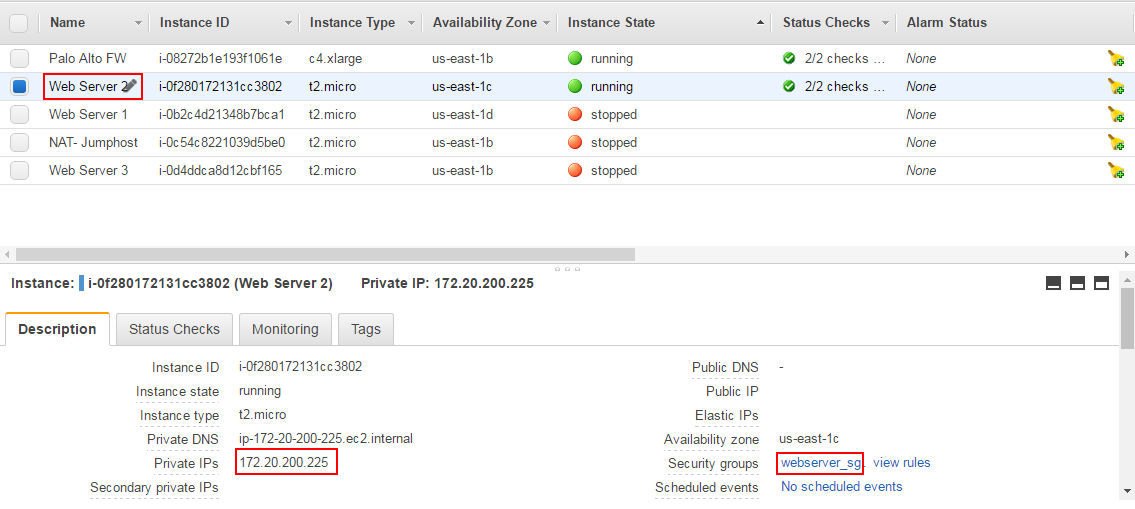

Once the instance is started, you can see the Palo Alto rulebase updated with new rule #4:

Note that only one rule was added (for ssl - tcp port 443) since port 80 was already allowed by rule #2 in the rulebase.
Adding rules to a security group
Next I updated the security group ‘webserver_sg’ and added two new rules:

The lambda function adds two new rules with the security group id as the name:

Removing a rule from a security group
Finally, I removed one of the newly added rules from the security group (for port 22):

And the rulebase was updated accordingly:
Notes and considerations
There might be a delay from the time of an event to the time the action is seen in the Palo Alto gateway. This is because AWS can have up to 5-15 minutes delay from the time an API call is made to the time it is logged in CloudTrail. I am not aware of an easy way to overcome this, other than configure the lambda function to run on a schedule (for example every 1 or 5 minutes), or moving the code to be run continuously on a host that has access to CloudTrail and can monitor it in real time.
In my tests, I used a public IP address of the Palo Alto gateway to configure it. This was easier since I didn’t place my lambda function to run from within my VPC, and so it couldn’t access the private IP address. To have the lambda function access the Palo Alto gateway through a private IP address, the lambda function must be run from within the VPC, and with security groups assigned to allow it to access the private IP of the Palo Alto. Furthermore, running lambda from within the VPC might interfere with how it accesses S3 objects since those are accessed through the internet. The easiest way to get around this to have an endpoint created in the VPC for accessing S3 (See https://aws.amazon.com/blogs/aws/new-vpc-endpoint-for-amazon-s3/).
All ICMP rules from AWS are treated the same when pushed to Palo Alto (configured with the application ‘icmp’ that would allow all types of ICMP regardless of the configuration in the security groups). Modify the function aws_to_pa_services to introduce more granularity.
Currently only inbound rules from the security groups are examined and added, but I will be adding support for outbound rule access as well.
Download
You can download the latest version of the code on github.
To use the code as is, you only need to upload the zip file to your lambda function. If you want to make modifications, you have to zip all files (lambda.py, paloalto.py, netaddr, and netaddr-0.7.18.dist-info).
I hope this has been helpful, and note that while the functionality described in this post should be fully functional, there are a number of other features that are in progress, and the github link will be updated as these features are completed.