Friday, November 11, 2016

Beginning Memory Forensics - Rekall - Stuxnet

Before moving forward, I would like to shout out MichaelHale Ligh for his analysis of Stuxnet using volatility. This post was basically me trying to learn more about Rekall while trying to retrace Mike's step using Rekall to understand Stuxnet rather than reusing volatility. To get a better understanding of this post you should probably either review Mike's post first or have it opened while you go through this one.

I've done a few posts on using various tools for memory forensics. For example, in this post I used volatility, while in this post I used Mandiant's memorize. In this post we will now look at Rekall and will use a memory sample from  jonrajewski.com. The objective here is to learn a bit about Rekall and in doing so let's try to uncover some of the artifacts that Michael Hale Ligh found in his analysis of Stuxnet. Note, we are not trying to find all but hoping to learn how to use Rekall for the basics.

First let's install Rekall on Kali

Following the guidelines from the Rekall manual, let's first install "virtualenv"
"apt-get install virtualenv"


Now that "virtualenv" is installed, let's continue with the install

"virtualenv /tmp/MyEnv"
Install the "rekall-gui"
Note: If during the installation you get an error relating to “ldcurses” look at the reference section for a possible solution.

Now that we have Rekall properly installed, the first thing you may want to do is look at the help.
Simply type "rekall -h"
Rekall Modes
Rekall has an interactive mode, a non interactive mode and a web console. By providing a plugin to the command, we would use the non-interactive mode. So if you wish to use the interactive mode, only execute the "rekall" command with the file you would like to analyze.

Let's look at this in practice.
Non-interactive mode:
(rekal) root@securitynik:~/mem_forensics# rekall --filename stuxnet.vmem pslist

That's it! Just run the "rekall" command with the filename and a plugin. In the above example we use the "imageinfo" plugin to learn a little bit more about the acquired image. As a result, we were able to learn that this device image is from a Windows XP system. We can also tell this system seems to have been up for about 16 hrs (56949 seconds)

Interactive mode
Let's spend the rest of the time looking at this tool in interactive mode.
To get there all we need is
(rekal) root@securitynik:~/mem_forensics# rekall --filename stuxnet.vmem
 
Note above there is no plugin. This drops us into the interactive shell from which we can now work out of.

Let's first take a look at the processes which are running.
[1] stuxnet.vmem 22:56:55> pslist
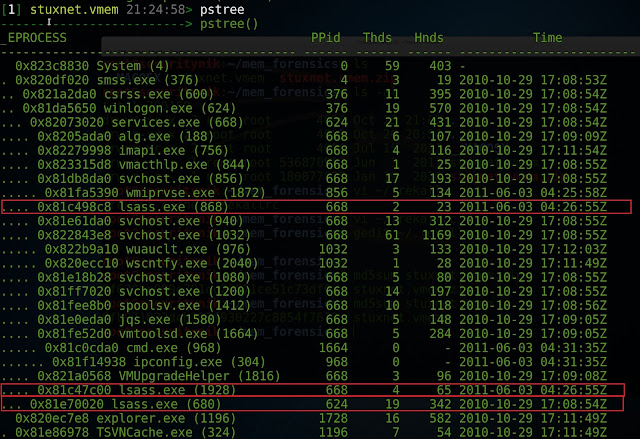
According to Mike, we should be seeing one "lsass.exe" which has a parent of "Winlogon.exe". However, as shown above and as stated by Mike, we have three "lsass.exe" processes. One has a parent of "Winlogon.exe" and the other two have a parent of "services.exe". This means now that we should take a closer look at these 3 processes.
[1] stuxnet.vmem 22:55:58> tokens proc_regex=("lsass.exe")


From the above image, we see that the 3 "lsass.exe" processes basically have the same SIDS.

Let's move on!
Let's identify the priorities of the 3 "lsass.exe" processes. To determine this, let's run "[1] stuxnet.vmem 23:00:40> SELECT _EPROCESS.name, _EPROCESS.pid,_EPROCESS.Pcb.BasePriority FROM pslist(
                      ...: ) WHERE regex_search("lsass.exe",_EPROCESS.name)"

From above we see that the two suspicious entries have a base priority of 8 while the one we assume is legit has a higher priority of 9.
  
Continuing to learn about the processes, let's look at the DLLs they are using.
[1] stuxnet.vmem 19:05:16> dlllist [680,868,1928]
From above, we see the "lsass.exe" (PID 680) having a large number of DLLs. Note this image only represents a portion of the DLLs associated with this PID.

However, if we look at the two processes of concern PID 868 and PID 1928 we see a fewer amount with PID 868 having the fewest DLLs.


Image of PID 1928 has been truncated. However, the number of DLLs, is still less than that of PID 680.
Something interesting to note about these two PIDs also is that in both of the "Command Line" arguments, it seems the backlash (\) is being escaped (\\). This definitely differs from the legitimate entry with PID 680.

Taking a look at the handles associated with the 3 PIDs using:
[1] stuxnet.vmem 19:50:33> handles [680,868,1928]


When a look is taken at the handles, we see that PID 680 has a signiicant amount of handles while 868 and 1928 does not have as much. Note the output has been sniped.

Let's now run "malfind" against these PIDs to see if anything suspicious shows up.
[1] stuxnet.vmem 20:13:01> malfind [680,868,1928]


When the command was run, no results were returned for PID 680 (the process we believe to be legitimate). The same was not true for PIDs 868 and PID 1928

As we can see there seems to be an executable "MZ Signature" starting at offset 0x80000 for both of these PIDs.

Let's use the "ldrmodules" plugin to gain a bit more insight into the “lsass.exe” process with PID 1928.
[1] stuxnet.vmem 23:46:06> ldrmodules 1928               

A quick glance at the image above immediately suggest something may be wrong and worthy of investigations. Other than the obvious "red" colour, there are no path information in for these 3 entries. Also notice that the offset matches those which we identified above using the “malfind” plugin. This would suggest the dll is probably hidden as it may be unlinked from one or more lists within the Process Environment Block (PEB).       

We see the same thing for the process with PID 868
[1] stuxnet.vmem 09:35:07>ldrmodules 868


stepping back and running the dlllist command again
"[1] stuxnet.vmem 17:10:56> dlllist 1928"
We see the following:

Taking a dump of the 3 "lsass.exe" processes, we see:
[1] stuxnet.vmem 17:17:29> procdump [680,868,1928], dump_dir="./out"
 
Running "strings" and "grep" against the files which were created to look for the functions Mike mentioned we see the following:
root@securitynik:~/mem_forensics/out# strings --print-file-name --data --encoding=s executable.lsass.exe*  | grep --perl-regexp "ZwMapViewOfSection|ZwCreateSection|ZwOpenFile|ZwClose|ZwQueryAttributesFile|ZwQuerySection"


As we can see above, the strings "ZwMapViewOfSection, ZwCreateSection, ZwOpenFile, ZwClose, ZwQueryAttributesFile, ZwQuerySection" are not in the legit lsass (PID 680) but are in the other two. This can be seen from the image above.

Let's verify that "ZWClose" is at "0x7c90cfd0". To do that let's perform a "dump" of that memory location.
[1] stuxnet.vmem 22:12:31> dump 0x7c90cfd0

So we see that "ZWClose" is at that memory location. Let's switch context into PID 668 and disassemble the memory location.

Switching context to PID 668
[1] stuxnet.vmem 22:04:52> cc 668

Let's disassemble the memory location.
[1] stuxnet.vmem 22:20:29> dis 0x7c90cfd0
 
Moving along, disassemble 0x7c900050
[1] stuxnet.vmem 22:26:10> dis 0x7c900050
 
... and still moving along looking at the call "0x7c900066"
[1] stuxnet.vmem 22:35:11> dis 0x7c900066, length=1

... and yet another disassembly at "0x009400F2"

....

Filtering for object types "Mutant" in PID 668, we see the following:
[1] stuxnet.vmem 23:04:33> handles 668, object_types="Mutant"


Peeking into the registry to look for the MrxNet registry key
[1] stuxnet.vmem 23:24:33> printkey 'ControlSet001\Services\MrxNet'

And now for the MrxCls key
[1] stuxnet.vmem 23:27:08> printkey 'ControlSet001\Services\MrxCls'
 
Let's take one more run at the artifacts by looking at the loaded modules.
[1] stuxnet.vmem 23:39:35> modules                        


Ok then, if the objective was to learn to use Rekall for memory forensics, I think we have achieved that to some extent. Once again, thanks to Mike for his post on analyzing stuxnet using volatility.


Monday, November 7, 2016

Ways to secure your password within your PowerShell scripts

This is a guest post  Mr. Troy Collins

Resonantly I had a problem given to me by a colleague at work.


Overview of the problem:
The Citrix team has some Powershell scripts running to gather Citrix information 2 times a day via schedule task within Windows. A security issue occurred with the SMTP relay server that he was using for sending out the reports and the team that managed it forced all users to authenticate via user/pass and a mailbox to send messages.  

The problem:
The script has to run as one account that has access to the Citrix environment and the account they gave to send out the messages was different.  So who do we run the scheduled task as? The Citrix account to gather the data or send with another account and secure the password?

Solution:
I created 2 scripts one to create the secure password that you use only once and the other was updated version of the original.

Create the password hash:

#here we ask for the users input.  -AsSecureString hides the password on the screen

$pass = Read-Host "Enter Password" -AsSecureString
#Next we convert the pass and export the hash string to text file.  ( I found it easyer to copy/paste from the text file insted of the screen) 
"$pass" | ConvertTo-SecureString -AsPlainText -Force | ConvertFrom-SecureString | out-file ./passwd.txt
#opens the text file for you to copy the hash
invoke-item ./passwd.txt
# this part is just to delete the file to leave nothing behind.
 Write-host "would you like to delete the password file?" -ForegroundColor Yellow 
    $Readhost = Read-Host " ( y / n ) " 
    Switch ($ReadHost) 
     { 
       Y {
remove-item ./passwd.txt -force -confirm:$false

       N {Write-Host "Your Done..."} 
}

Now we take the hash we created and added it to whatever script we need to have authentication with. 

This example we are using the username / password to authenticate to e-mail server to send a message but you could use this for any command or script that can use the -Credential string.  

$username = "domain\username"
$pass = "01000000d08c9ddf0---HASH----00c04fc297eb0100000000425808144"
$passwd = ConvertTo-SecureString -String $pass
$cred = New-Object -typename System.Management.Automation.PSCredential -argumentlist $username, $passwd

send-MailMessage -smtpServer smtp.someserver.com

 -Credential $cred -from 'user@somedomain.com' -to 'someone@domain.com -subject
 'Test' -attachment test.txt -body $message​

After thought:
Although this is more secure than just putting the password in the script it's not impossible to get the password, so NTFS permissions from the O/S should also be used to this script file itself. 

Enjoy

Tuesday, November 1, 2016

On recruiting and retaining talented Cyber Security professionals

I recently read the Center for Strategic (CSIS) International Studies report on Recruiting and Retaining Cyber security Ninjas and have to agree, that in this industry where cyber security professionals are in high demand, we need to find creative ways of not just recruiting but definitely retaining. It also definitely confirmed my view that money is not all when it comes to retaining talented personnel. Things such as having a challenging workplace and definitely training to keep our skillset relevant are absolutely more important.

What I did find surprising was that talented cyber security professionals don't want to have to assume management responsibilities to advance in their careers. This is understandable, as even I was not sure if I wanted to go the management route when it was proposed. However, I've embraced it and have no regrets. This is something though organizations will have to continue looking at. Maybe there will be a need to create more technical paths that runs parallel to the management path. 

Most importantly and as the report stated, most of us prefer to have a flexible work environment. I believe this becomes even more relevant when a family has to be considered. That flexibility, be it the ability to work from home or work alternate hours, etc is way more important than money.

The biggest takeaway though is that as stated "... even in organizations that pays and treat their employees well, there can be a great deal of disappointment and early turnover." This is further emphasized by "No matter how good a job may be, there are many other employers willing to pay more and promise greater responsibility ...". This definitely should come as no surprise as talented cyber security professionals are truly in great demand. I'm a witness to that on both sides of the fence. On one side being, recruited and the other watching my team members being recruited.


Sunday, October 2, 2016

Leveraging WMIC for 'live' Remote forensics

This is a continuation of the previous post. As a result, to get the most of this post you should review the previous post.

The idea here is that that you learned a host in your infrastructure is running "VBoxService.exe". You would now like to know if there are other hosts within your environment that is running the same process. To figure out what is going on we can first try the following.

C:\>WMIC /Node:127.0.0.1,10.0.2.15 PROCESS WHERE Name="VBoxService.exe" GET CSName, Name, ExecutablePath, ProcessID, ParentProcessID


From the above, we see we were able to look across hosts 127.0.0.1 and 10.0.2.15 to identify which hosts may be running the "VBoxService.exe" process. However, the problem with this method is its not quite scalable. Imagine appending (or prepending) IPs to the list. This can become a major problem to manage.

The alternative (which is better) is to provide WMIC a list of IPs in a file and let it read the values from the file.

Let's try the previous command again. This time by providing an input file.

I've created a file named "myNodes.txt" which contains the 2 IPs we just used. Below shows the file and its contents.


Now let's run this against WMIC.
C:\>WMIC /Node:127.0.0.1,10.0.2.15 PROCESS WHERE Name="VBoxService.exe" GET CSName, Name, ExecutablePath, ProcessID, ParentProcessID

The output above shows that host "SECURITYNIK-XP" (note the 2 instances of it because basically I was targeting the same system from two different IPs) has the process running.

From the above image, we see that by adding a list of IPs to a file, we were able to determine where a particular process is running within an infrastructure.


Go ahead and try to see how you can leverage WMIC in your environment if you have not been doing so already

Well that's it for this post!

Leveraging WMIC for local 'live' forensics

Let's assume, that you as the incident responder within your office sitting, sipping on some coffee or whatever else you do at the office. Then all of a sudden, you get a call that says, "hey it looks like something is wrong with my computer". So you got up from your desk to see what's going on and decide to leverage the WMIC utility which is built into Microsoft Windows operating system. Leveraging WMIC is helpful because there is no need for any additional tools which are not part of the OS.

So now that you are there, the first thing you decide to do ... after taking a memory dump ... is to run WMIC to get the system name. Let's do that.

C:\>WMIC COMPUTERSYSTEM LIST BRIEF

While this provided helpful information there was more we could have gotten if we had run
C:\>WMIC COMPUTERSYSTEM LIST FULL
However, the previous command would give us probably a little bit more than we need at this time. As a result, let's be picky about the information we would like.

C:\>WMIC COMPUTERSYSTEM GET Domain, Model, Name, PartOfDomain, UserName, SystemType, TotalPhysicalMemory

From the above we see we were able to extract the Domain the computer is in, its name, whether or not it is part of a domain, the username of the currently logged in user, the system type and the total physical memory.

Looks like we at least know a little about the system. Hope you are documenting your steps so far :-)

 Let's look to see what programs are running
 C:\>WMIC PROCESS LIST BRIEF

While the above image shows very useful information, there is still a bit that is left out.

If we were to use the "C:\>WMIC PROCESS LIST FULL" we would get lots of information. More than we need. Let's focus in on the information which would probably be helpful.

C:\>WMIC PROCESS GET Name, ExecutablePath, HandleCount, ProcessID, ParentProcessID

From the above we see we have a nice view which now includes the executable path of the process. We also have the handle count which shows the number of handles which the process has opened. Additionally, we see the process id and parent process id. This is much more useful information.

So now that we've identified the list of processes, let's take a specific process and gather all the information available for it.
C:\>WMIC PROCESS WHERE Processid=824 LIST FULL


From the above we see that we've learned all the information that is available for a specific process

For the rest of the way, we will use "LIST BRIEF", "LIST FULL" AND "GET" as needed. We already know we can get some information from "list brief" and a lot from "list full". However, it is best if we target the information which may be useful to us at for this investigation.

Let's find out the users who are currently created on the system..

C:\>WMIC USERACCOUNT GET Caption, FullName, Name

Now that we have the list of users on the system. Let's take a look at their network login information

C:\>WMIC NETLOGIN GET FullName, UserID, LastLogon, Name, UserType

From the above we were able to grab the logged on user name, full name, last logon and user type

Ok. I will stop now. The idea was to show that you can leverage WMIC which is built into Windows to gather information which you would have typically gathered from other tools, some built into Windows while some are 3rd party.

See the next post for information on leveraging WMIC for "live" remote forensics.

Ahhhh ... That Google interview process - interesting and exciting


Recently I was reached out to for a role within Google as a Manager within its Detection Team. After completing the phone interview, I was invited to be onsite at its office in Mountain View, California. The experience of the onsite interview is something I will appreciate for a very long time.

It started with an interview with a senior leader within Google, then I headed off to lunch with my potential manager. After lunch I had 3 interviews with 4 persons back to back to back consisting of various managers within and around my potential working area. These interviews challenged me in a few instances but generally was interesting but not overly overwhelming.


While it was not overwhelming, there were a few technical areas which I just don't do on a daily basis and was not as sharp at, while there were others which has never been my primary or secondary focus during my career. While most of the questions tried to focus on my thought process, there are just topics in life (like some technical stuff) which you just can't add logic to and if you did, you may seem ignorant about the topic.

While in the end I was not offered the job, I am still flattered that Google thought I was interesting enough to consider making me part of their team. It did massage my ego ;-)

So what's the take away for you if you looking to go work for Google?
If you are interested in working for Google and do get yourself through the door, ensure you are prepared and basically that you know your stuff. While you may be going for one specific role, be prepared for questions that may come on the outskirts of the areas you are being interviewed for. Remember Google is an engineering company :-)

Some other links that may be helpful in preparing you for your Google interview.

Sunday, September 25, 2016

IBM Qradar: How to import logs from an Amazon S3 compatible log source

Many vendors nowadays are using the Amazon S3 API as a method to access and download their logs. Cisco is an example of this, and they host their Cloud Web Security (CWS) product logs at vault.scansafe.com and use the Amazon S3 API to make the logs accessible to their users (Other vendors include Hitachi, EMC Vcloud, and many more).

IBM Qradar has added support for the Amazon S3 API as a log protocol to allow Qradar to download logs from AWS services such as CloudTrail, but we found out that the use of this protocol on Qradar is limited to downloading logs if they are stored on Amazon S3, and that we couldn’t use it in the case of products such as Cisco CWS where the logs are hosted on their own servers.

To add Cisco CWS as a log source for IBM Qradar, we used a manual python script to download the logs using the S3 API to a local directory on the Qradar console, and then configured Qradar to automatically import the logs from that local directory.


In this blog post, I will walk through the steps to allow you to add S3 compatible log destinations as log sources in Qradar. The overall steps are as follows:

  1. Download the script to the Qradar server (console or log collector).

  2. Install dependencies for the script and configure the script parameters.

  3. Setup a cronjob to run the script on a recurrent basis.

  4. Create a new log source in Qradar to pull the downloaded log files using SFTP.

Cisco support has a python script available to automatically pull logs from their servers for CWS (vault.scansafe.com). However, the script needed to be modified and a few features to be added before we could properly run it on Qradar (Original script can be requested from Cisco support here):

  • Added statefulness to the script. Originally, the script would download all log files available every time it ran, but this meant it could be downloading many gigabytes of data on each run. Instead, we added the capability of saving the timestamp of the last file downloaded, and then only downloading recently created log files on subsequent runs.

  • Cleanup: Once the log files are downloaded and processed by Qradar, there is no need to keep the files on the system. The script was modified so that it deletes files after a set number of hours.
  • The script was written for a newer python version but Qradar has version 2.6 installed. We had to modify the ‘with .. as’ statements as they were not supported, and replaced them with manual os.open and gzip.open (and corresponding close) function calls.

The full script can be found at the bottom of this post.


Script setup and configuration

  1. First, copy the script to Qradar using SCP. You can choose any directory you prefer (We placed it under /opt/qradar/bin/)

  2. Install the boto python library (Boto is the AWS SDK provided by Amazon):

    1. Download boto-2.42.0.tar.gz from https://pypi.python.org/pypi/boto (This is the older version but the script was written to use it, and so we didn’t modify it).

    2. Copy the file to Qradar.

    3. Uncompress the file using tar ('tar -xzvf boto-2.42.0.tar.gz').

    4. Install boto by running ‘python setup.py install’ from the directory the files were extracted to.

  3. Edit the script using vi and set the following values:

    1. Endpoint: hostname for the endpoint hosting the logs (For Cisco CWS this would be vault.scansafe.com).

    2. accessKey: Should be provided from the vendor

    3. secretKey: Should be provided from the vendor

    4. bucket: Should be provided from the vendor

    5. localPath: Local path to where the files should be downloaded (We used /store/tmp/)

    6. Hours: number of hours to keep the files after they were downloaded. The default is one hour.

  4. Add execution permissions to the file ('chmod +x cws_script.py').

  5. Configure a cronjob to run the script automatically. We set the script to run every 5 minutes, and as a rule you should set it to run more frequently than the interval at which Qradar is processing them. To configure cron to run the script every 5 minutes:

    1. Edit the cronjob scheduled tasks by running ‘crontab -e’

    2. Add the following line at the end:

*/5 * * * * /opt/qradar/bin/cws_script.py >> /var/log/cws-script.log 2>&1


Create a new log source in Qradar


  1. From the Qradar Console go to Admin > Log Sources, and click Add.

  2. Select Univeral DSM for the ‘Log Source Type’, and select ‘Log File’ for the protocol.

  3. Choose ‘SFTP’ and enter the Qradar’s own IP address and enter user/password details.

  4. Set the Remote Directory to the directory on Qradar to which the script downloads the log files.

  5. For ‘File Pattern’ enter a regex that would match the files downloaded. For Cisco CWS logs, we used ‘.*txt’

  6. Set the recurrence to specify the interval at which Qradar will import the logs. We used 15M so that the log files are processed every 15 minutes.

Once configured and saved, you can verify operations by going to the ‘Log Activity’ tab and setting the newly added log source as a filter and then viewing the logs as they are downloaded. You can also use the log file specified when configuring the cronjob to verify the script operations and if it is running properly.


Script


#!/usr/bin/env python

import gzip
import boto
import boto.s3.connection
import sys, os

from boto.s3.key import Key
from datetime import datetime

# Required parameters

accessKey = 'access key here'
secretKey = 'secret key here'
bucket = 'bucket id here'
localPath = '/store/tmp/logfiles' # local path to download files to
endpoint = 'vault.scansafe.com'
hours = 1  #number of hours to keep downloaded files


# Optional parameters
extractLogs = True   # set to True or False. If set to True, the script will also extract the log files from the downloaded .gz archives
consolidateLogs = False   # set to True or False. If True, will consolidate content of all .gz archives into a single file, <bucket-id>.log

if not localPath.endswith('/'):
        localPath = localPath + "/"

current_datetime = datetime.now()

print "======================================================="
print "Running at",current_datetime

# Get the date/time for the last downloaded file (stored in the file 'timestamp')

if os.path.exists(localPath+"timestamp"):
 last_download_timestamp = str(open(localPath+"timestamp",'r').read()).strip() 
 print "Last timestamp",last_download_timestamp
 last_download_timestamp = datetime.strptime(last_download_timestamp, '%Y-%m-%jT%H:%M:%S.000Z')
else:
 last_download_timestamp = ""


s3Conn = boto.connect_s3(accessKey, secretKey, host=endpoint)
myBucket = s3Conn.get_bucket(bucket, validate=False)

print "Connected to CWS backend infrastructure..."
print "Downloading log files to " + localPath + "\n"

for myKey in myBucket.list():
 if (last_download_timestamp == "" or last_download_timestamp < datetime.strptime(myKey.last_modified, '%Y-%m-%jT%H:%M:%S.000Z')):
  print "{name}\t{size}\t{modified}".format(
   name = myKey.name,
   size = myKey.size,
   modified = myKey.last_modified,
   )

  #save the timestamp of the last file read
  timestamp = open(localPath+"timestamp",'w')
  timestamp.write(myKey.last_modified)
  timestamp.close()


  fileName = os.path.basename(str(myKey.key))
  if not os.path.exists(localPath + fileName):

   myKey.get_contents_to_filename(localPath + fileName)

   if extractLogs:
    mode = 'w'
    extractedFilename = fileName[:-3]

    if consolidateLogs:
     extractedFilename = bucket + ".log"
     mode = 'a'

    extractedLog = os.path.join(localPath, extractedFilename)

    gzipFile = gzip.open(localPath + fileName, 'rb')
    print "{name} extracted to {log_file}".format(
     name = myKey.name,
     log_file = extractedFilename,
     )
    gzFile = gzipFile.read()
    unzippedFile = open(extractedLog, mode)
    for line in gzFile:
     unzippedFile.write(line)
    gzipFile.close()
    unzippedFile.close()

# Clean files older than number of hours specified 
dnldFiles = os.listdir(localPath)
for file in dnldFiles:
 if ((datetime.now() - datetime.fromtimestamp(os.path.getmtime(localPath+file))).seconds > (hours * 60 * 60)):
  print "deleting file",file
  os.remove(localPath + file)

print "\nLog files download complete.\n"