I recently had a request which had me pulling my hair out (it's not like I have any). The request to dump all of the QRadar rules. Having looked at the "custom_rule" table, I thought I may be able to do this. I then focused in on the "rule_data" field, only to find this information is in a manner which I could not even figure out the best way to parse.
While IBM did not have a way to do this, I was however, pointed to a location which may be helpful ... and it was very helpful. I assume, someone else may have a similar request in the future and thought I should post output here to retrieve a dump of all the rules.
The following commands will dump all rules and building blocks.
psql --username=qradar --no-align --command="SELECT rule_data FROM custom_rule" | grep "^<?xml" | sed --expression 's/<notes\/>/<notes><\/notes>/' --expression='s/.*<name>\(.*\)<\/name><notes>\(.*\)<\/notes>.*/"\1","\2"/' | sort > qradar.rules.csv
P.S. There are now a few other ways of achieving this. Check these links:
https://github.com/NdS-Research-Facilities/QRadar-ruleset
https://www.ibm.com/support/knowledgecenter/en/SSKMKU/com.ibm.qradar.doc_cloud/c_cmt_import_export_methods.html
https://www.ibm.com/developerworks/community/forums/html/topic?id=ad76e30e-0674-4be7-b376-1b34f9d24ac4&ps=25
https://developer.ibm.com/answers/questions/419663/export-list-of-rules-in-qradar/
For additional information you can visit
https://www.ibm.com/developerworks/community/forums/html/topic?id=77777777-0000-0000-0000-000014969023
Wednesday, October 7, 2015

Friday, October 2, 2015
Forensics File Carving with Bless
In this post, similar to the foremost and scalpel posts, I have a small (64 MB) flash drive with a couple of files (shown below) which were created under Windows. The assumption is someone provided me this drive as a raw image to perform a forensic investigation to retrieve whatever files are on the disk.

For this post we will carve a file using "Bless". We will pick on the pdf file at offset "1530880" and a size of "88" bytes. As to where I get this offset from, let assume one of two things. Either this offset was provided to us by someone or through a tool such as foremost or scalpel which was previously used. In this case let's use the output from the foremost post. To ensure we understand the pdf header and trailer, we will use some information from "http://www.garykessler.net/library/file_sigs.html".

So let's load up Bless and go to offset "1530880"
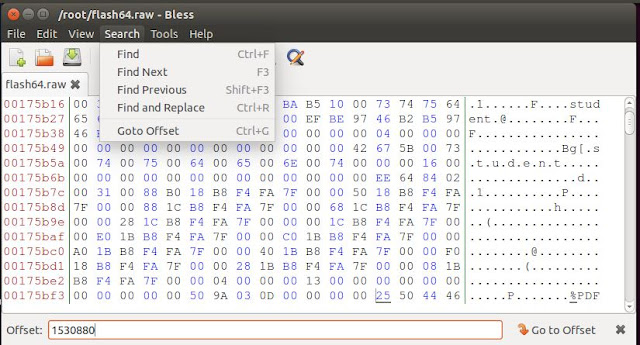
Now that we have identified at offset "1530880" there is a "pdf" header, let's now try to find the trailer. From the information provided by "http://www.garykessler.net/library/file_sigs.html" we see there are multiple possible trailers but one thing that is constant is the "%%EOF". Let's do a "find" for the first one at its absolute location.
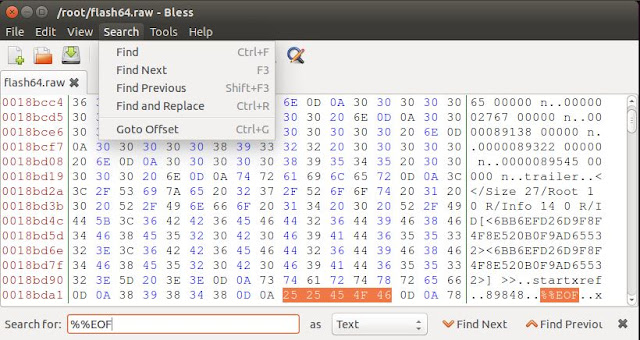
From the above, we see that "%%EOF" was found and ends at offset "1621603". Now that we have a starting offset "1530880" and an ending offset "1621603" let's try to carve our pdf file.
Lets use Bless's "Select range" menu option to obtain those bytes.
Our "Select range from" will be our starting point "1530880" and ends at "1621603".
from the image below we have highlighted all the bytes between "1530880" and "1621603"
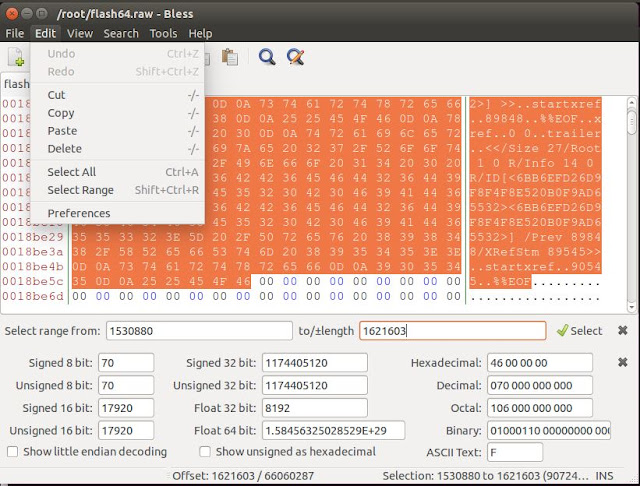
Let's now use the same menu to select "copy." Once copied, we will create a new window and paste these bytes. Next step will be to save it as "extractedPDF.pdf".
Next use your favourite pdf reader to open the file. Below we see that we have successfully carved the "pdf" file from the image.
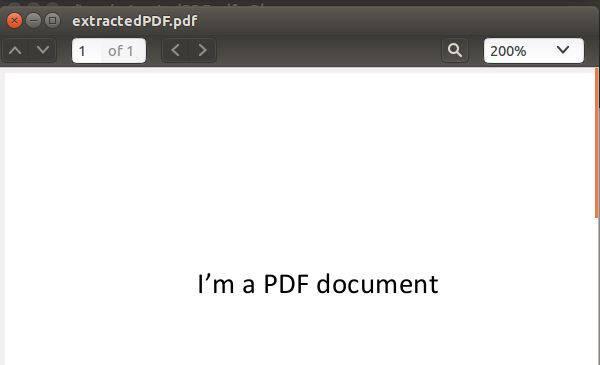
In the posts on foremost and scalpel, tools were used to carve data. In this post the process was manual independent of tools (well except for Bless). It is important that we understand how a tool should work when we are using it to perform a task.
References:
Bless
For this post we will carve a file using "Bless". We will pick on the pdf file at offset "1530880" and a size of "88" bytes. As to where I get this offset from, let assume one of two things. Either this offset was provided to us by someone or through a tool such as foremost or scalpel which was previously used. In this case let's use the output from the foremost post. To ensure we understand the pdf header and trailer, we will use some information from "http://www.garykessler.net/library/file_sigs.html".
So let's load up Bless and go to offset "1530880"


Now that we have identified at offset "1530880" there is a "pdf" header, let's now try to find the trailer. From the information provided by "http://www.garykessler.net/library/file_sigs.html" we see there are multiple possible trailers but one thing that is constant is the "%%EOF". Let's do a "find" for the first one at its absolute location.

From the above, we see that "%%EOF" was found and ends at offset "1621603". Now that we have a starting offset "1530880" and an ending offset "1621603" let's try to carve our pdf file.
Lets use Bless's "Select range" menu option to obtain those bytes.
Our "Select range from" will be our starting point "1530880" and ends at "1621603".
from the image below we have highlighted all the bytes between "1530880" and "1621603"

Let's now use the same menu to select "copy." Once copied, we will create a new window and paste these bytes. Next step will be to save it as "extractedPDF.pdf".
Next use your favourite pdf reader to open the file. Below we see that we have successfully carved the "pdf" file from the image.

In the posts on foremost and scalpel, tools were used to carve data. In this post the process was manual independent of tools (well except for Bless). It is important that we understand how a tool should work when we are using it to perform a task.
References:
Bless
Forensics File Carving with Scalpel
In this post, similar to the foremost post, I have a small (64 MB) flash drive with a couple of files (shown below) which were created under Windows. The assumption is someone provided me this drive as a raw image to perform a forensic investigation to retrieve whatever files are on the disk.

As with most Linux tools, before running them you may wish to see what the options are for execution by looking at the help. In this case to get help from scalpel type "scalpel -h"
Similar to the foremost post, I also modified the "scalpel.conf" file to just focus on the files which I know are on the drives.


Let's now execute scalpel
scalpel -c /etc/scalpel/scalpel.conf -o securitynikTmp/ -v flash64.raw
- c: Tells scalpel to use the configuration file which is found in "/etc/scalpel/scalpel.conf"
- o: Tells scapel to use output directory "securitynikTmp"
- v: Tells scalpel to be verbose
flash64.raw is the file which will be used as input to scalpel
Now that scalpel has executed we perform a "ls" on the "securitynikTmp" folder and see the following:

Let's look at the audit.txt to see what was extracted
root@securitynik:~# cat securitynikTmp/audit.txt

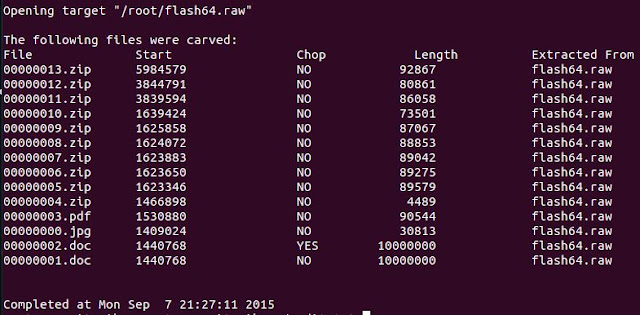
Let's look to see how well the .jpg file was extracted
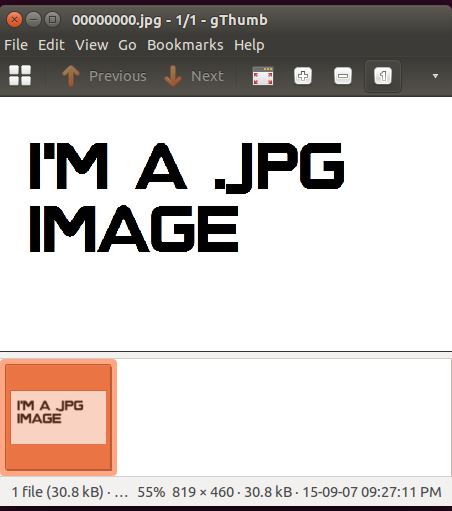
So far so good. Looks like we successfully extracted the .jpg file because we have opened and can view it with gthumb.
While tools like foremost and scalpel are helpful for automatically retrieving these files, it is also important that we understand how to do this process manually. In the next post we will leverage information learned from foremost and scalpel to manually carve a file.
References:
scalpel
gthumb
As with most Linux tools, before running them you may wish to see what the options are for execution by looking at the help. In this case to get help from scalpel type "scalpel -h"
Similar to the foremost post, I also modified the "scalpel.conf" file to just focus on the files which I know are on the drives.

Let's now execute scalpel

scalpel -c /etc/scalpel/scalpel.conf -o securitynikTmp/ -v flash64.raw
- c: Tells scalpel to use the configuration file which is found in "/etc/scalpel/scalpel.conf"
- o: Tells scapel to use output directory "securitynikTmp"
- v: Tells scalpel to be verbose
flash64.raw is the file which will be used as input to scalpel
Now that scalpel has executed we perform a "ls" on the "securitynikTmp" folder and see the following:

Let's look at the audit.txt to see what was extracted
root@securitynik:~# cat securitynikTmp/audit.txt


Let's look to see how well the .jpg file was extracted
So far so good. Looks like we successfully extracted the .jpg file because we have opened and can view it with gthumb.
While tools like foremost and scalpel are helpful for automatically retrieving these files, it is also important that we understand how to do this process manually. In the next post we will leverage information learned from foremost and scalpel to manually carve a file.
References:
scalpel
gthumb
Forensics File Carving with Foremost and dcfldd
In this post I have a small (64 MB) flash drive with a couple of files (shown below) which were created under Windows. The assumption is someone provided me this drive as a raw image to perform a forensic investigation to retrieve whatever files are on the disk.

Prior to providing an image of the drive "dcfldd" was used to create a forensic copy of the drive as shown below.

Next we verify that both the output file and the log files are created and below we see they are.
 Now let's use foremost to see if we can retrieve the same data as shown above.
Before running any tool you may want to see what the help has to offer in terms of guidance.
For foremost, we can execute "foremost -h" to get help as shown below.
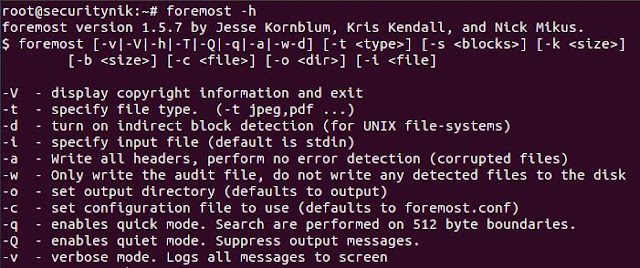
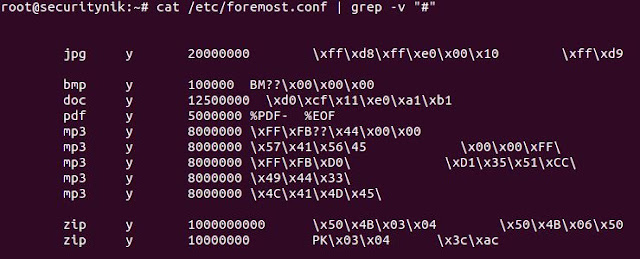
Next let's edit the foremost config file. "vi /etc/foremost.conf". I edited the default configuration file, allowing it to search for the file extensions which are on the drive. If the drive only had .pdf files I could have searched for just that. In this case I'm searching for pdf, bmp, doc, mp3 and zip. The objective was to not look for things which were not there. Additionally, it is important to understand how the "foremost.conf" file is structured as you may wish to add your own file structure to search for.
Next I create a temporary folder named "securitynikTmp" using "mkdir securitynikTmp"
Let's now run foremost to see what we get
root@securitynik:~# foremost -c /etc/foremost.conf -o securitynikTmp -v flash64.raw

- c: Tells foremost to use the configuration file which is found in "/etc/foremost.conf"
- o: Tells foremost to use output directory "securitynikTmp"
- v: Tells foremost to be verbose
flash64.raw is the file which will be used as input to foremost
Once foremost has completed we see the following (note that the actual files extracted has been omitted for brevity).
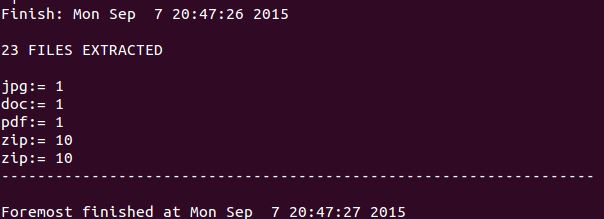
Next if we perform a "ls" on the "securitynikTmp" folder, we see the following listing showing that foremost created a folder for each file extension type.
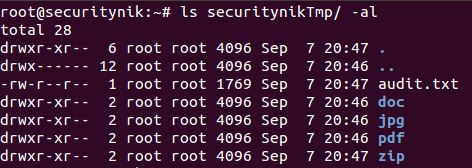
The "audit.txt" shows the output from the execution of the foremost command. Basically this information is much similar (if not the same) to the information which was seen on the screen during the execution of foremost.
Let's now look at the "pdf" folders. Below we see there was one pdf file.

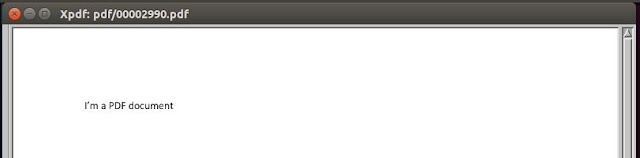
Let's open this file using "xpdf" and see what the contents provide us.

As we can see the pdf file opened successfully.
That's it for foremost. Next post we will use scalpel to perform the similar task.
References:
Foremost
xpdf
dcfldd

Next we verify that both the output file and the log files are created and below we see they are.
Now let's use foremost to see if we can retrieve the same data as shown above.Before running any tool you may want to see what the help has to offer in terms of guidance.
For foremost, we can execute "foremost -h" to get help as shown below.

Next let's edit the foremost config file. "vi /etc/foremost.conf". I edited the default configuration file, allowing it to search for the file extensions which are on the drive. If the drive only had .pdf files I could have searched for just that. In this case I'm searching for pdf, bmp, doc, mp3 and zip. The objective was to not look for things which were not there. Additionally, it is important to understand how the "foremost.conf" file is structured as you may wish to add your own file structure to search for.

Next I create a temporary folder named "securitynikTmp" using "mkdir securitynikTmp"
Let's now run foremost to see what we get
root@securitynik:~# foremost -c /etc/foremost.conf -o securitynikTmp -v flash64.raw

- c: Tells foremost to use the configuration file which is found in "/etc/foremost.conf"
- o: Tells foremost to use output directory "securitynikTmp"
- v: Tells foremost to be verbose
flash64.raw is the file which will be used as input to foremost
Once foremost has completed we see the following (note that the actual files extracted has been omitted for brevity).
Next if we perform a "ls" on the "securitynikTmp" folder, we see the following listing showing that foremost created a folder for each file extension type.
The "audit.txt" shows the output from the execution of the foremost command. Basically this information is much similar (if not the same) to the information which was seen on the screen during the execution of foremost.
Let's now look at the "pdf" folders. Below we see there was one pdf file.
Let's open this file using "xpdf" and see what the contents provide us.
As we can see the pdf file opened successfully.

That's it for foremost. Next post we will use scalpel to perform the similar task.
References:
Foremost
xpdf
dcfldd
Thursday, September 3, 2015
Browser Forensics Investigation with Mandiant Redline - Part 2
In part one, we establish our criteria for testing, now let's see how well Redline does.
Below shows Redline configuration for detecting browsing history


Figure below shows Redline various tags

Figure below shows an extract of some of the information retrieved from the various cookies

Figure below shows the File Download History of Redline

By default, Redline provides fields such as “Created”, “Modified”, “Changed”, etc as shown in figure 11 below.

In addition, timelines can be viewed by “Users”, “TimeWrinkles”, “TimeCrunches”, “Processes”, etc.
Time Wrinkles allows users to select a date and time, then based on this date and time you can specify a number of minutes for which you would like to see information before and after this time.
Initial Configuration
Redline has been configured to use all installed browsers. This is achieved by not specifying any browser but leaving the system to identify data from all installed browsers.
Below shows Redline configuration for detecting browsing history

Initial Data Retrieval
Figure below shows the results retrieved from the system, As can be seen no entry was returned for Project Spartan or Opera 11.

Filtering Data
Redline provides the ability to filter data based on multiple criteria such as “contains”, “equals”, regex, etc.
Figure below shows the filter options available in Mandiant’s Redline. These filters makes looking for specific data relatively easy.

Figure below shows the filter options available in Mandiant’s Redline. These filters makes looking for specific data relatively easy.

Searching
In addition to filtering, Redline provides the ability
to search across one or more fields using regular expressions (regex).
This can help tremendously in quickly identifying patterns across the
data, reducing the amount of time needed for capturing same and or
similar data patterns.
Figure below shows Redline’s search capabilities using regex.

Figure below shows Redline’s search capabilities using regex.

Tagging
The ability to “tag” with the objective of understanding what is priority, important or what action should be taken on a specific entry is critical for focusing on the things which are considered relevant for your investigation. Redline tags uses various colors and numbers from 0 to 6 with actions which you may tag the items with.Figure below shows Redline various tags

Cookies
Redline’s ability to identify and extract the contents of cookie within the one tool is very important. Some of the information reported for cookies are its name, file path, contents, creation and expiration dates, etc.Figure below shows an extract of some of the information retrieved from the various cookies

Download history
It’s critical to be able to identify any files which were downloaded during the browsing activity. Redline provides the Download Type”, the “URL” from which the download occurred, the “Target Directory” to where the file was saved, its “Filename” number of “Bytes Downloaded” etc.
Figure below shows the File Download History of Redline

Timeline
Timeline analysis is very important to the forensics process. It’s provides the analyst with the ability to pinpoint exactly when an event occurred. The analyst can then correlate this information with data from other sources to get a clearer picture and context of what may have transpired.
By default, Redline provides fields such as “Created”, “Modified”, “Changed”, etc as shown in figure 11 below.

In addition, timelines can be viewed by “Users”, “TimeWrinkles”, “TimeCrunches”, “Processes”, etc.
Time Wrinkles allows users to select a date and time, then based on this date and time you can specify a number of minutes for which you would like to see information before and after this time.
Figure below shows the TimeWrinkle configuration


Tags and Comments
Being
able to tag and leave notes about items you identify during the
forensics process is just as important as identifying the events.
Redline’s “Tags and Comments” provides the ability to leave notes on an
identified items while allowing the analyst to determine how important
it is to the task being performed.
Well that's it for a detailed analysis of using Mandiant Redline to perform browser forensics investigations. In part one we laid the foundation of the testing and in this part two we looked at the how we can use Redline to verify that information.

Browser Forensics Investigation with Mandiant Redline - Part 1
When performing a forensic investigation, every piece/source of information becomes relevant. In this post, we will focus on the information which we can learn from browsers. For this post I will use Mandiant Redline. However, there are many tools out there which will can perform similar function.
Redline is considered Mandiant’s premier free tool for host investigative capabilities (Mandiant, 2015). While Redline has the ability to audit and collect running processes and drivers from memory, file system metadata, registry data, event logs, network information, service and tasks (Mandiant, 2015) the objective of this post is to evaluate its web history component.
Figure below shows Mandiant's Redline Main Screen

Firefox v39.0
Internet Explorer v11.0
Google Chrome - v43.0.2357.134 m
Opera v30.0.1835.125
Project Spartan (Microsoft Windows [Version 10.0.10130])
Links visited
Date visited
Time visited
Cookies
Search entries
Action taken
Browser used
Files downloaded
http://www.gmail.com
http://www.cnn.com
http://www.washingtonpost.com
http://www.nba.com
http://www.nhl.com
https://www.youtube.com
http://www.portableapps.com
http://www.sourceforge.net
Search for “Linux Security”
https://www.youtube.com/watch?v=Liw86dRI0Qo
https://www.youtube.com/watch?v=Liw86dRI0Qo
https://www.youtube.com/watch?v=c_PZvA9qi2k
http://sourceforge.net/projects/ophcrack/?source=directory
http://sourceforge.net/projects/shielausbshield/?source=directory
http://sourceforge.net/projects/modbus-traffic-generator/?source=directory
http://portableapps.com/apps/music_video/cdex_portable
http://portableapps.com/apps/music_video/audacity_portable
Now that we have laid out the information relating to the test, in part two we will look at the actual analysis. See you there
Redline is considered Mandiant’s premier free tool for host investigative capabilities (Mandiant, 2015). While Redline has the ability to audit and collect running processes and drivers from memory, file system metadata, registry data, event logs, network information, service and tasks (Mandiant, 2015) the objective of this post is to evaluate its web history component.
Figure below shows Mandiant's Redline Main Screen

OS used
Windows 10 Insider Preview
Browsers Tested
Firefox v39.0
Internet Explorer v11.0
Google Chrome - v43.0.2357.134 m
Opera v30.0.1835.125
Project Spartan (Microsoft Windows [Version 10.0.10130])
Functional Analysis
This analysis will test Redline's ability to identify the following from all browsers.Links visited
Date visited
Time visited
Cookies
Search entries
Action taken
Browser used
Files downloaded
Links opened within each browser
http://securitynik.blogspot.comhttp://www.gmail.com
http://www.cnn.com
http://www.washingtonpost.com
http://www.nba.com
http://www.nhl.com
https://www.youtube.com
http://www.portableapps.com
http://www.sourceforge.net
Videos played from
htttp://www.youtube.comSearch for “Linux Security”
https://www.youtube.com/watch?v=Liw86dRI0Qo
https://www.youtube.com/watch?v=Liw86dRI0Qo
https://www.youtube.com/watch?v=c_PZvA9qi2k
Files downloaded from sourceforge.net
http://sourceforge.net/projects/clamwin/?source=directoryhttp://sourceforge.net/projects/ophcrack/?source=directory
http://sourceforge.net/projects/shielausbshield/?source=directory
http://sourceforge.net/projects/modbus-traffic-generator/?source=directory
Files downloaded from portable apps:
http://portableapps.com/apps/music_video/aimp-portablehttp://portableapps.com/apps/music_video/cdex_portable
http://portableapps.com/apps/music_video/audacity_portable
Now that we have laid out the information relating to the test, in part two we will look at the actual analysis. See you there
Splunk Investigation - Who Enabled That Account
The objective of this post is to quickly determine through the use of splunk, who enabled a particular account.
Using search "SecurityNik" produced " 28,376 events (before 7/10/15 11:13:04.000 AM)" results.
The above starts across "All Time"
From below, we see that on "07/08/2015 06:31:55 PM" "SecurityNik" account was disabled by user "OtherAdmin" on computer "SecurityNik_DC.securitynik.com". "SecurityNik_DC.securitynik.com" is one of the Domain Controllers.
07/08/2015 06:31:55 PM
EventCode=4738
Message=A user account was changed
ComputerName=SecurityNik_DC.securitynik.com
Subject:
Security ID: SECURITYNIK\OtherAdmin
Logon ID: 0x13309228
Target Account:
Security ID: SECURITYNIK\SecurityNik
Old UAC Value: 0x10210
New UAC Value: 0x10211
User Account Control: Account Disabled
Below shows that the account "SecurityNik" was disabled on "03/13/2015 11:27:03 AM" by user "SecurityAdmin". While above it was disabled on the Domain Controller "SecurityNik_DC.securitynik.com", in this case it was disabled on "SECURITYNIK_TS".
03/13/2015 11:27:03 AM
EventCode=4738
Message=A user account was changed
ComputerName=SECURITYNIK_TS
Subject:
Security ID: SECURITYNIK_TS\SecurityAdmin
Logon ID: 0x85817e4d
Target Account:
Security ID: SECURITYNIK_TS\SecurityNik
Old UAC Value: 0x10
New UAC Value: 0x11
User Account Control:
Account Disabled
User name SecurityNik
Full Name SecurityNik
Account active No
Last logon 7/20/2014 10:42:40 PM
The information above confirms that the "SecurityNik" account is disabled on computer "SECURITYNIK_TS"
06/10/2014 04:38:00 PM
EventCode=4738
ComputerName=SECURITYNIK_TS
Message=A user account was changed.
Subject:
Security ID: SECURITYNIK_TS\SecurityAdmin
Logon ID: 0x4a072799
Target Account:
Security ID: SECURITYNIK_TS\SecurityNik
User Account Control:
Account Enabled
06/10/2014 10:12:52 AM
EventCode=4738
ComputerName=SecurityNik_DC.securitynik.com
Message=A user account was changed.
Subject:
Security ID: SECURITYNIK\OtherAdmin
Logon ID: 0xa6644425
Target Account:
Security ID: SECURITYNIK\SecurityNik
User Account Control:
Account Enabled
The findings at this point is that for the domain "securitynik.com" user "SecurityNik" was last enabled on "06/10/2014 10:12:52 AM" by account "OtherAdmin". In addition, the account for "SecurityNik" was also enabled on computer "SECURITYNIK_TS" by account "SecurityAdmin"
Using search "SecurityNik" produced " 28,376 events (before 7/10/15 11:13:04.000 AM)" results.
The above starts across "All Time"
From below, we see that on "07/08/2015 06:31:55 PM" "SecurityNik" account was disabled by user "OtherAdmin" on computer "SecurityNik_DC.securitynik.com". "SecurityNik_DC.securitynik.com" is one of the Domain Controllers.
07/08/2015 06:31:55 PM
EventCode=4738
Message=A user account was changed
ComputerName=SecurityNik_DC.securitynik.com
Subject:
Security ID: SECURITYNIK\OtherAdmin
Logon ID: 0x13309228
Target Account:
Security ID: SECURITYNIK\SecurityNik
Old UAC Value: 0x10210
New UAC Value: 0x10211
User Account Control: Account Disabled
Below shows that the account "SecurityNik" was disabled on "03/13/2015 11:27:03 AM" by user "SecurityAdmin". While above it was disabled on the Domain Controller "SecurityNik_DC.securitynik.com", in this case it was disabled on "SECURITYNIK_TS".
03/13/2015 11:27:03 AM
EventCode=4738
Message=A user account was changed
ComputerName=SECURITYNIK_TS
Subject:
Security ID: SECURITYNIK_TS\SecurityAdmin
Logon ID: 0x85817e4d
Target Account:
Security ID: SECURITYNIK_TS\SecurityNik
Old UAC Value: 0x10
New UAC Value: 0x11
User Account Control:
Account Disabled
Analyzing "SECURITYNIK_TS"
running the command "C:\>net user | findstr /i SecurityNik" determined that the user "SecurityNik" has an account on "SECURITYNIK_TS"Learning more about account "SecurityNik"
running "C:\>net user SecurityNik" shows (none relevant information extracted)User name SecurityNik
Full Name SecurityNik
Account active No
Last logon 7/20/2014 10:42:40 PM
The information above confirms that the "SecurityNik" account is disabled on computer "SECURITYNIK_TS"
"SecurityNik" account being enabled on "SECURITYNIK_TS"
Below shows that "SecurityNik" account was enabled on "SECURITYNIK_TS" by user "SecurityAdmin". Please note this "SecurityAdmin" account is for the local machine and not the Domain.06/10/2014 04:38:00 PM
EventCode=4738
ComputerName=SECURITYNIK_TS
Message=A user account was changed.
Subject:
Security ID: SECURITYNIK_TS\SecurityAdmin
Logon ID: 0x4a072799
Target Account:
Security ID: SECURITYNIK_TS\SecurityNik
User Account Control:
Account Enabled
"SecurityNik" account being enabled on "SecurityNik_DC.securitynik.com"
Below shows that the account "SecurityNik" was enabled on "06/10/2014 10:12:52 AM" by user "OtherAdmin."06/10/2014 10:12:52 AM
EventCode=4738
ComputerName=SecurityNik_DC.securitynik.com
Message=A user account was changed.
Subject:
Security ID: SECURITYNIK\OtherAdmin
Logon ID: 0xa6644425
Target Account:
Security ID: SECURITYNIK\SecurityNik
User Account Control:
Account Enabled
The findings at this point is that for the domain "securitynik.com" user "SecurityNik" was last enabled on "06/10/2014 10:12:52 AM" by account "OtherAdmin". In addition, the account for "SecurityNik" was also enabled on computer "SECURITYNIK_TS" by account "SecurityAdmin"
Subscribe to:
Posts (Atom)